To get started you obviously need a tablet PC that supports pen input (haven't had a chance to play with touch input). I am working with a HP 2710p with Windows XP Tablet PC Edition 2005.
Start by putting a split control on your form with a horizontal split. In the top portion place a Panel control and set the dock to fill. In the bottom section insert a textbox and a button.
Add a reference to the Microsoft Tablet PC API, it is in the .NET tab near the top. In the Code view above the Public Class statement use an Imports Microsoft.Ink. Next, after the Class but before the first Sub, create an ink overlay with
Dim inkOverlay As New InkOverlay
We want the dimensions of the ink surface to cover only the surface of the panel, we do this with the controls handle:
inkOverlay.Handle=Me.Panel1.Handle
inkOverlay.Enabled=True
The second part enables the control, you must disable the control to do work such as save and load, and then re-enable when you are ready to accept more ink.
Run the program and you should now be able to write on the panel and nowhere else.
One of the first things i like to create is a way to clear what is in the panel, a way for the user to wipe out everything or for you to prepare the panel for another entry. To understand how this works (and later, other features) you need to know a little about how the inkoverlay works.
Inkoverlay is basically a container that you are filling up with Strokes, pen movements, that can later be worked with. These strokes can then be managed, you can use a recognizer to decipher meaning, delete or move a collection of strokes, or change their color and many other functions. So right now we want to delete all of the current strokes, this is accomplished in the following manner.
Sub ClearInk()
On Error Resume Next 'you can handle errors later in your own way
inkOverlay.Enabled=False
inkOverlay.Ink.DeleteStrokes(inkOverlay.Ink.Strokes)
Panel1.Invalidate()
inkOverlay.Enabled=True
End Sub
Stepping through you'll see error handling which you can make more robust on your own. You then disable the collection so you don't have the collector trying to update while you are working with it, then invalidate the panel (this basically just refreshes the drawing of the panel), and finally, don't forget to enable the control again.
Double-click the button on your form to bring up its click event handler, and call your Clear sub:
ClearInk()
Your button should now clear out all of your strokes.
The final piece of this tutorial is to get some text from what is written. There are many methods that i might touch on in the future, but for now I will show you a simple way to convert ink to text for someone who writes fairly well.
First things first, we want to utilize the events of the inkOverlay so we need to change its declaration, change
Dim inkOverlay As New InkOverlay
to
Private WithEvents inkOverlay As New InkOverlay
Withough getting into the weeds, the WithEvents is just providing us access to the inkoverlay events, you will see it appear at the top of your screen along with the other form and control events. Choose inkOverlay from the left dropdown and choose Stroke from the right dropdown.
Every time you put the pen to pad, a stroke starts, when you pick it up the stroke ends and that is when the Stroke event is fired.
Now we need to add a recognizer, which is basically a tool that makes sense of the strokes and can be optimized to make recognition easier. After the Private WithEvents statement, dimension these tools:
Dim oRecognizers As New Recognizers()
Dim oReco As Recognizer=oRecognizers.GetDefaultRecognizer
Dim oRC As RecognizerContext=oReco.CreateRecognizerContext
Its definitely not a part of this tutorial, just know that you can create custom recognizers and context to help limit the chance of a bad reading, or to program in your own characters or symbols.
In the stroke event place the following code:
oRC.Strokes=inkOverlay.Ink.Strokes
Dim cnt=oRC.Strokes.Count
oRC.EndInkInput()
Dim iStat as RecognitionStatus
Dim oResult as RecognitionResult
If cnt=0 Then Me.TextBox1.Clear()
If cnt<>0 Then
oResult=oRC.Recognize(iStat)
Me.TextBox1.Text=oResult.TopAlternate.ToString
End If
What we are doing here is loading the recognizer with the strokes we want to recognize, counting those strokes so we are only recognizing when something is actually there and then we are placing the result. The final part can be the most confusing, if you put a break where you are updating the textbox you can see a little bit more about what is going on and what your options are. For this, i created a fairly vertical stroke similar to the letter I.
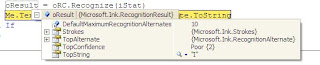 The first thing this tells us that there are 10 possibilities for this stroke, then further down it shows TopConfidence, this is how confident it is that TopString is actually what we want. As you add more strokes these confidences etc will change. Adding a horizontal line in the center like I'm drawing an H returns a Strong confidence that the answer is 't', adding another vertical gives me a Strong confidence for 'H'. You can use this confidence to manage writing, only returning Strong, or Poor if you like, but this limits recognition for poor writers.
 One thing I have noticed is that the recognizers are poor at recognizing letters drawn in a different way than is normally seen, this occurs a lot with left-handers. If i draw a perfect L but do it from the bottom drawing left and up I never get L as an answer but I do if I draw down and to the right. The recognizer looks at how the letter is drawn, not just what is present on-screen. I don't have any tricks or workarounds for that.
Next part will involve saving and loading ink.
No comments:
Post a Comment