Interfaces have made a huge leap forward in products such as the iPhone that allows you to navigate using gestures, your programs can do this too, and its not as difficult as you might expect.
The tutorial that follows will utilize several concepts from tableadapters to inkoverlays and I will not go too far into detail on them while creating them, but each of these is discussed in-depth with samples in this blog, you just need to do a quick find if you get a little lost. If there are several comments on this being an issue i can dig further, but i am trying to get away from re-creating the wheel with every post. With that, lets get going already.
I have a datagrid on a form and using it is a pain, you can increase the size of the grid and the font of the text etc., but that scroll bar is a huge issue. I don't know exactly what the solution is yet, but this is an attempt at using gestures to control scrolling.
First I am going to add a split container control to my form (I do this a lot for testing, one screen for input, the other for textboxes, label etc to test outputs). Next, create a datasource linking to a database, I am going with the Customer table of the Northwind.mdb. To follow along in this post you will need to accomplish this all in design view (should take 20 seconds) if you don't know how, read the section on table adapters. Drag the table to the left side of your screen and dock it there. As usual i deleted the bindingsource bar. Add a listbox control and a textbox to the right have of the splitter. You should now have a listbox, textbox, datagrid, TableAdapterManager, CustomersTableAdapter, CustomersBindingSource, and a NorthwindDataSet.
Now we need to set up our inkoverlay, start with the imports statement:
Imports Microsoft.Ink
and the squiggly line tells me i forgot to do the reference, d'oh! Add a reference to Microsoft Tablet PC API (near the top of the .NET tab).
Next, add the WithEvents statement below Class but before Sub:
Private WithEvents inkOverlay As New InkOverlay
After the Tableadapter fill method in the load event place the code for the inkOverlay
inkOverlay.CollectionMode = CollectionMode.GestureOnly
inkOverlay.SetGestureStatus(ApplicationGesture.Down, True)
inkOverlay.SetGestureStatus(ApplicationGesture.Up, True)
AddHandler InkOverlay.Gesture, AddressOf Gesture_Event
InkOverlay.Enabled = True
For this sample i want gesture only, no ink, and for now i only want to recognize the up and down gestures. We still have an event handler to Gesture_Event so I will copy the event from the other sample and change it up a bit.
Dim theGesture As Gesture = e.Gestures(0)
If theGesture.Id = ApplicationGesture.Down Then
Me.CustomersDataGridView.FirstDisplayedScrollingRowIndex += 10
End If
If theGesture.Id = ApplicationGesture.Up Then
Me.CustomersDataGridView.FirstDisplayedScrollingRowIndex -= 10
End If
What this does, is when we flick down with the pen, the datagrid scrolls up 10 rows, and vice-versa. Give it a try. I know its a little slow, I'll work on a different method, but for now this works fine.
This next step may not work on a small datagrid or for people with shaky movements, but you can use it as a 'what's possible'. To your Up and Down declerations, add a Right. Then in the Gesture_Event add this
If theGesture.Id = ApplicationGesture.Right Then
Me.ListBox1.Items.Add(Me.CustomersBindingSource.Current("CustomerID"))
End If
This means that a flick of the pen to the right will add the data in the CustomerID column of the selected row to the listbox.
Add 'Circle' to your gestures and add this bit:
If theGesture.Id = ApplicationGesture.Circle Then
Me.CustomersBindingSource.RemoveCurrent()
Me.CustomersDataGridView.Refresh()
End If
Now when you draw a circle the selected row is deleted. If you draw outside of the row unintended things could happen. The best way that i have found to handle many of these gesture issues is to create a little area where they can perform the gestures. I put a small panel somewhere and tie the inkoverlay to that.
That's all for now on tablet programming, thanks for reading.
Friday, May 29, 2009
Thursday, May 28, 2009
Tablet Programming Part 3: Pen Input and Gesture Control
While you can create a sample on your own, it is best to start the Tablet Programming series at part 1 to build a sample. If you don't need a sample, jump right in.
This first part will only work on systems that can tell how the pen is being held, i'm not sure whether or not they all are, but just know you MAY not be able to do this on your particular model.
Erasing:
I thought this part would be a lot harder than it is (it can be if you try to get too fancy!).
From the left dropdown select inkOverlay, and select CursorInRange on the right to create a new event.
In the event place this code:
If e.Cursor.Inverted = True Then
If inkOverlay.EditingMode <> InkOverlayEditingMode.Delete Then
inkOverlay.EditingMode = InkOverlayEditingMode.Delete
End If
Else : Me.inkOverlay.EditingMode = Me.inkOverlay.EditingMode
End If
This is pretty self explanatory, if the cursor is inverted (like you are using an eraser) then the mode changes from drawing to deleting. You can play with the different delete modes, but the one above is the best in my opinion. You can just as easily call the ClearInk() function after e.Cursor.Inverted=True to clear the whole thing.
This is pretty self explanatory, if the cursor is inverted (like you are using an eraser) then the mode changes from drawing to deleting. You can play with the different delete modes, but the one above is the best in my opinion. You can just as easily call the ClearInk() function after e.Cursor.Inverted=True to clear the whole thing.
Selection:
One really cool feature is to allow people to move their text or drawings around, you do this with the select feature. Add a checkbox to your form and in its event place the following code:
If Me.CheckBox1.Checked Then
Me.inkOverlay.Enabled = False
Me.inkOverlay.EditingMode = InkOverlayEditingMode.Select
Me.inkOverlay.Handle = Me.Panel1.Handle
Me.inkOverlay.Enabled = True
Else
Me.inkOverlay.Enabled = False
Me.inkOverlay.EditingMode = InkOverlayEditingMode.Ink
Me.inkOverlay.Handle = Me.Panel1.Handle
Me.inkOverlay.Enabled = True
End If
All very straightforward, disable, change mode selection, reset the handle, and re-enable. Now checking the box will allow us to select items. To do this in conjunction with the cursor in range code from above we have to make a minor change, the entire cursor in range code should look like this:
If e.Cursor.Inverted = True Then
If inkOverlay.EditingMode <> InkOverlayEditingMode.Delete Then
inkOverlay.EditingMode = InkOverlayEditingMode.Delete
End If
ElseIf Me.inkOverlay.EditingMode = InkOverlayEditingMode.Select Then
Me.inkOverlay.EditingMode = InkOverlayEditingMode.Select
Else : Me.inkOverlay.EditingMode = Me.inkOverlay.EditingMode = InkOverlayEditingMode.Ink
End If
We are adding some handling for the select mode, had we not done this then even when the checkbox was checked if the pen went out of and then back into range, it would have changed to ink.
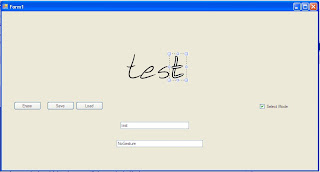
Now check the box and you should see your cursor change to a different symbol (kind of like cross-hairs) and you can draw lines around data to select it. It's hard to explain but just try it or look below.

Once it is selected, the movements and resizing should be familiar to you. Here is a shot of the strokes fully selected. If you notice an extra textbox its because i backed up to do the select piece after i did the gesture part below.
Gestures:
Gestures allow you to do things, or fire events when certain movments are made with the pen. For this tutorial I will demonstrate a few of the default gestures. There will be a more robust gesture control post later, for now, i'll demonstrate the basics.
First, there are 3 types of ink collection: GestureOnly, InkOnly, and InkAndGesture. You will need to change this as needed , usually in the form load event:
inkOverlay.CollectionMode = CollectionMode.InkAndGesture
inkOverlay.SetGestureStatus(ApplicationGesture.AllGestures, True)
AddHandler inkOverlay.Gesture, AddressOf Gesture_Event
inkOverlay.Enabled = True
This bit of code changes the mode as metioned above to InkAndGesture. Now, if you were to have all gestures available all of the time, you wouldn't get a whole lot of ink input because much of it would be interpreted as gestures. So, you can set which gestures you want to 'watch' for individually with SetGestureStatus. I selected AllGestures for this demonstration but you can play with it and see what it can do. Further down i will post a link to Microsoft's page describing each of the gestures.
The next part of the code creates a handler, this is a subject for another post, but just know that it lets us create a Gesture_Event and do something when the gesture occurs. Here is the Gesture_Event code:
Private Sub Gesture_Event(ByVal sender As Object, ByVal e As InkCollectorGestureEventArgs)
Dim theGesture As Gesture = e.Gestures(0)
TextBox2.Text = theGesture.Id.ToString
End Sub
In it, we are just getting the name of the gesture that was made and placing it into a textbox so you can look at what gestures are being recognized. Run the program and try to find some of the gestures listed here. http://msdn.microsoft.com/en-us/library/aa515956.aspx
Next: Advanced Gesture Control
Tablet Programming Part 2: Save, Load
This part builds off Tablet Programming Part 1, if you need to follow along then I advise completing it first.
In this step we will learn how to save and load ink.
Let's start with save. There are many file types that you can save to, but for these purposes I will show you the simplest and most useful, .ISF. With an .ISF file you can open it back up and continue adding strokes, wheras other formats are primarily for displaying a finished result such as a .GIF or .JPG file.
You won't need to add another reference, a simple imports will do.
Imports System.IO
You will also need to add an OpenFileDialog and a SaveFileDialog control to your form.
Drag another button to the bottom section of the split container, this will be the save button, place the following code in the event handler:
Dim inkBytes As Byte() = Me.inkOverlay.Ink.Save()
Me.SaveFileDialog1.FileName = "NewInk.isf"
Me.SaveFileDialog1.DefaultExt = ".isf"
If Me.SaveFileDialog1.ShowDialog = Windows.Forms.DialogResult.OK Then
Dim strm As FileStream = File.Open(Me.SaveFileDialog1.FileName, FileMode.Create)
strm.Write(inkBytes, 0, inkBytes.Length)
strm.Close()
End If
The first line is just prepping the data to be saved via file stream, the next two are formatting the save dialog to default to a particular name and file type. The next part just ensures that they hit 'OK' and actually want to save, and then you decide how you will handle the creation of the file with FileMode.Create. The rest is just the streamwriter creating the file, its really pretty simple and straightforward.
Loading is just as simple except a little added work for the end users sake, throw another button on your form to handle the loading.
If Me.OpenFileDialog1.ShowDialog = Windows.Forms.DialogResult.OK Then
If Me.OpenFileDialog1.CheckFileExists = True Then
strm = File.OpenRead(Me.OpenFileDialog1.FileName)
Dim info As FileInfo = New FileInfo(Me.OpenFileDialog1.FileName)
Dim inkBytes(info.Length) As Byte
strm.Read(inkBytes, 0, info.Length)
strm.Close()
Dim newInk As New Microsoft.Ink.Ink
newInk.Load(inkBytes)
Me.inkOverlay.Enabled = False
Me.inkOverlay.Ink = newInk
Me.inkOverlay.Enabled = True
End If
End If
This time we are doing a little more formatting by filtering all files that aren't .isf (though we give a selection to view all files). Next, instead of building a function to test whether or not a path is valid, we use .NETs own ability to do this for us. If they choose 'OK' and the filepath is valid then the loading occurs in the same way we saved, just in reverse. Once the load has occured, we must disable the ink object, set it to the loaded ink, and then re-enable. That's it for the load. As mentioned, using .ISF allows the recognizer to utilize the strokes from the saved files, you can test this by performing the load and then making a stroke, you will see that the textbox reads all of the loaded strokes.
Part 3: Pen Input is next.
Tablet Programming Part 1 Getting Started
Programming controls on tablets can be a bit tricky, and converting handwriting to something legible can be even trickier. In this post I will cover some of the basics of how to create controls that people can write on and how to convert that to numeric or text input. In a later post I will dive a bit further into this with a post on gesture control.
To get started you obviously need a tablet PC that supports pen input (haven't had a chance to play with touch input). I am working with a HP 2710p with Windows XP Tablet PC Edition 2005.
Start by putting a split control on your form with a horizontal split. In the top portion place a Panel control and set the dock to fill. In the bottom section insert a textbox and a button.
Add a reference to the Microsoft Tablet PC API, it is in the .NET tab near the top. In the Code view above the Public Class statement use an Imports Microsoft.Ink. Next, after the Class but before the first Sub, create an ink overlay with
Dim inkOverlay As New InkOverlay
We want the dimensions of the ink surface to cover only the surface of the panel, we do this with the controls handle:
inkOverlay.Handle=Me.Panel1.Handle
inkOverlay.Enabled=True
The second part enables the control, you must disable the control to do work such as save and load, and then re-enable when you are ready to accept more ink.
Run the program and you should now be able to write on the panel and nowhere else.
One of the first things i like to create is a way to clear what is in the panel, a way for the user to wipe out everything or for you to prepare the panel for another entry. To understand how this works (and later, other features) you need to know a little about how the inkoverlay works.
Inkoverlay is basically a container that you are filling up with Strokes, pen movements, that can later be worked with. These strokes can then be managed, you can use a recognizer to decipher meaning, delete or move a collection of strokes, or change their color and many other functions. So right now we want to delete all of the current strokes, this is accomplished in the following manner.
Sub ClearInk()
On Error Resume Next 'you can handle errors later in your own way
inkOverlay.Enabled=False
inkOverlay.Ink.DeleteStrokes(inkOverlay.Ink.Strokes)
Panel1.Invalidate()
inkOverlay.Enabled=True
End Sub
Stepping through you'll see error handling which you can make more robust on your own. You then disable the collection so you don't have the collector trying to update while you are working with it, then invalidate the panel (this basically just refreshes the drawing of the panel), and finally, don't forget to enable the control again.
Double-click the button on your form to bring up its click event handler, and call your Clear sub:
ClearInk()
Your button should now clear out all of your strokes.
The final piece of this tutorial is to get some text from what is written. There are many methods that i might touch on in the future, but for now I will show you a simple way to convert ink to text for someone who writes fairly well.
First things first, we want to utilize the events of the inkOverlay so we need to change its declaration, change
Dim inkOverlay As New InkOverlay
to
Private WithEvents inkOverlay As New InkOverlay
Withough getting into the weeds, the WithEvents is just providing us access to the inkoverlay events, you will see it appear at the top of your screen along with the other form and control events. Choose inkOverlay from the left dropdown and choose Stroke from the right dropdown.
Every time you put the pen to pad, a stroke starts, when you pick it up the stroke ends and that is when the Stroke event is fired.
Now we need to add a recognizer, which is basically a tool that makes sense of the strokes and can be optimized to make recognition easier. After the Private WithEvents statement, dimension these tools:
Dim oRecognizers As New Recognizers()
Dim oReco As Recognizer=oRecognizers.GetDefaultRecognizer
Dim oRC As RecognizerContext=oReco.CreateRecognizerContext
Its definitely not a part of this tutorial, just know that you can create custom recognizers and context to help limit the chance of a bad reading, or to program in your own characters or symbols.
In the stroke event place the following code:
oRC.Strokes=inkOverlay.Ink.Strokes
Dim cnt=oRC.Strokes.Count
oRC.EndInkInput()
Dim iStat as RecognitionStatus
Dim oResult as RecognitionResult
If cnt=0 Then Me.TextBox1.Clear()
If cnt<>0 Then
oResult=oRC.Recognize(iStat)
Me.TextBox1.Text=oResult.TopAlternate.ToString
End If
What we are doing here is loading the recognizer with the strokes we want to recognize, counting those strokes so we are only recognizing when something is actually there and then we are placing the result. The final part can be the most confusing, if you put a break where you are updating the textbox you can see a little bit more about what is going on and what your options are. For this, i created a fairly vertical stroke similar to the letter I.
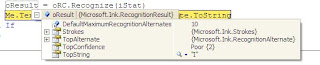 The first thing this tells us that there are 10 possibilities for this stroke, then further down it shows TopConfidence, this is how confident it is that TopString is actually what we want. As you add more strokes these confidences etc will change. Adding a horizontal line in the center like I'm drawing an H returns a Strong confidence that the answer is 't', adding another vertical gives me a Strong confidence for 'H'. You can use this confidence to manage writing, only returning Strong, or Poor if you like, but this limits recognition for poor writers.
To get started you obviously need a tablet PC that supports pen input (haven't had a chance to play with touch input). I am working with a HP 2710p with Windows XP Tablet PC Edition 2005.
Start by putting a split control on your form with a horizontal split. In the top portion place a Panel control and set the dock to fill. In the bottom section insert a textbox and a button.
Add a reference to the Microsoft Tablet PC API, it is in the .NET tab near the top. In the Code view above the Public Class statement use an Imports Microsoft.Ink. Next, after the Class but before the first Sub, create an ink overlay with
Dim inkOverlay As New InkOverlay
We want the dimensions of the ink surface to cover only the surface of the panel, we do this with the controls handle:
inkOverlay.Handle=Me.Panel1.Handle
inkOverlay.Enabled=True
The second part enables the control, you must disable the control to do work such as save and load, and then re-enable when you are ready to accept more ink.
Run the program and you should now be able to write on the panel and nowhere else.
One of the first things i like to create is a way to clear what is in the panel, a way for the user to wipe out everything or for you to prepare the panel for another entry. To understand how this works (and later, other features) you need to know a little about how the inkoverlay works.
Inkoverlay is basically a container that you are filling up with Strokes, pen movements, that can later be worked with. These strokes can then be managed, you can use a recognizer to decipher meaning, delete or move a collection of strokes, or change their color and many other functions. So right now we want to delete all of the current strokes, this is accomplished in the following manner.
Sub ClearInk()
On Error Resume Next 'you can handle errors later in your own way
inkOverlay.Enabled=False
inkOverlay.Ink.DeleteStrokes(inkOverlay.Ink.Strokes)
Panel1.Invalidate()
inkOverlay.Enabled=True
End Sub
Stepping through you'll see error handling which you can make more robust on your own. You then disable the collection so you don't have the collector trying to update while you are working with it, then invalidate the panel (this basically just refreshes the drawing of the panel), and finally, don't forget to enable the control again.
Double-click the button on your form to bring up its click event handler, and call your Clear sub:
ClearInk()
Your button should now clear out all of your strokes.
The final piece of this tutorial is to get some text from what is written. There are many methods that i might touch on in the future, but for now I will show you a simple way to convert ink to text for someone who writes fairly well.
First things first, we want to utilize the events of the inkOverlay so we need to change its declaration, change
Dim inkOverlay As New InkOverlay
to
Private WithEvents inkOverlay As New InkOverlay
Withough getting into the weeds, the WithEvents is just providing us access to the inkoverlay events, you will see it appear at the top of your screen along with the other form and control events. Choose inkOverlay from the left dropdown and choose Stroke from the right dropdown.
Every time you put the pen to pad, a stroke starts, when you pick it up the stroke ends and that is when the Stroke event is fired.
Now we need to add a recognizer, which is basically a tool that makes sense of the strokes and can be optimized to make recognition easier. After the Private WithEvents statement, dimension these tools:
Dim oRecognizers As New Recognizers()
Dim oReco As Recognizer=oRecognizers.GetDefaultRecognizer
Dim oRC As RecognizerContext=oReco.CreateRecognizerContext
Its definitely not a part of this tutorial, just know that you can create custom recognizers and context to help limit the chance of a bad reading, or to program in your own characters or symbols.
In the stroke event place the following code:
oRC.Strokes=inkOverlay.Ink.Strokes
Dim cnt=oRC.Strokes.Count
oRC.EndInkInput()
Dim iStat as RecognitionStatus
Dim oResult as RecognitionResult
If cnt=0 Then Me.TextBox1.Clear()
If cnt<>0 Then
oResult=oRC.Recognize(iStat)
Me.TextBox1.Text=oResult.TopAlternate.ToString
End If
What we are doing here is loading the recognizer with the strokes we want to recognize, counting those strokes so we are only recognizing when something is actually there and then we are placing the result. The final part can be the most confusing, if you put a break where you are updating the textbox you can see a little bit more about what is going on and what your options are. For this, i created a fairly vertical stroke similar to the letter I.
The first thing this tells us that there are 10 possibilities for this stroke, then further down it shows TopConfidence, this is how confident it is that TopString is actually what we want. As you add more strokes these confidences etc will change. Adding a horizontal line in the center like I'm drawing an H returns a Strong confidence that the answer is 't', adding another vertical gives me a Strong confidence for 'H'. You can use this confidence to manage writing, only returning Strong, or Poor if you like, but this limits recognition for poor writers. One thing I have noticed is that the recognizers are poor at recognizing letters drawn in a different way than is normally seen, this occurs a lot with left-handers. If i draw a perfect L but do it from the bottom drawing left and up I never get L as an answer but I do if I draw down and to the right. The recognizer looks at how the letter is drawn, not just what is present on-screen. I don't have any tricks or workarounds for that.
Next part will involve saving and loading ink.
Tuesday, May 19, 2009
TableAdapter Part3
This is something I found just the other day while working with the Fill method. If you want to follow along, add a datasource and drag a table to your form (see earlier posts if you don't know how). I am working with the Customers table from the Northwinds.mdb.
This is a short post but very beneficial. Say you have a table you need to work with but you are doing it on a pretty puny device, or the table is really huge, I will show you how to change the TableAdapters Fill method to be dynamic so you can pull only what you need.
In the old days you could change the select command and pass it right into the database to get what you want, while TableAdapters still have all of the commands, they are not exposed without jumping through hoops. Whoever decided that this was a good idea....well nevermind, we work with what we have.
Right-clicking the dataset in your Data Sources screen, click "Edit DataSet with Designer". Now you should have a .xsd tab with a little diagram of your table and the tableadapter. Right-click where it says "Fill, GetData()" and select configure, you will see the current select statement. You can type the next part manually, or to be sure its right, you can use the Query Builder button.
The Query Builder is just like the query builder in Access, do what you want and the SQL changes automatically. In this scenario my program will need data for the country it is running in. To set this up, in Query Builder I would navigate to Country and place a '?' in the Filter column:
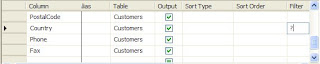 Click Finish, and then notice that the "Fill,GetData()" has been replaced with "Fill,GetData(Country)" .
This is a short post but very beneficial. Say you have a table you need to work with but you are doing it on a pretty puny device, or the table is really huge, I will show you how to change the TableAdapters Fill method to be dynamic so you can pull only what you need.
In the old days you could change the select command and pass it right into the database to get what you want, while TableAdapters still have all of the commands, they are not exposed without jumping through hoops. Whoever decided that this was a good idea....well nevermind, we work with what we have.
Right-clicking the dataset in your Data Sources screen, click "Edit DataSet with Designer". Now you should have a .xsd tab with a little diagram of your table and the tableadapter. Right-click where it says "Fill, GetData()" and select configure, you will see the current select statement. You can type the next part manually, or to be sure its right, you can use the Query Builder button.
The Query Builder is just like the query builder in Access, do what you want and the SQL changes automatically. In this scenario my program will need data for the country it is running in. To set this up, in Query Builder I would navigate to Country and place a '?' in the Filter column:
Click Finish, and then notice that the "Fill,GetData()" has been replaced with "Fill,GetData(Country)" .Go to your code where the Fill method is and you'll see that you now have an error. The '?' told the program that you will be passing in data, so you need to do that. You can do this by typing in the information:
Me.CustomersTableAdapter.Fill(Me.NorthwindDataSet.Customers, "Germany")
Or you could make it dynamic by tying it to a textbox, dropdowb, My.Settings etc.
By using this method you keep things dynamic while maintaining full access to the database. Instead of bogging the program down with thousands or millions of unnecessary records in a dataset and then populated into a view, you are only pulling what you need at that particular time.
BindingSource
The .NET BindingSource was an area of great confusion for me, I kept wanting to use the DataGridView to sort and filter and all that and it kept me from doing a lot of things, from this point forward you should use DataGrids and DataGridViews to display and format data ONLY.
I am going to use the form that I built for the TableAdapter series as an example, but really the only thing you need to do is create a DataSource and drag a table onto your form letting .NET create the necessary components, including the BindingSource.
I connected to the Northwind.mdb and will be referring to the Customer table.
There are many confusing posts out there about filtering datasets, tables, views etc. The easiest way to do this without a doubt is by utilizing the BindingSource .NET creates for you. Filtering can be confusing so you might need to Google some SQL language if you have issues.
To start, I want to only see customers in the USA, placing this code at any time after the .NET created Fill:
Me.CustomersBindingSource.Filter = "Country='USA'"
Simple right? Many of the posts out there on filtering use custom "views" of data, if you do that you can be in big trouble when you want to use multiple views, back out one of the filters etc. Just filter the one and you should have no issues.
You have multiple criteria? Use the &= to add another to the filter, you can even use LIKE though sometimes it is difficult to get the quote marks right. I want all USA customers with Manager in their title:
Me.CustomersBindingSource.Filter = "Country='USA'"
Me.CustomersBindingSource.Filter &= " AND ContactTitle like '*Manager*'
Dont for get the AND, and don't forget that it needs a space seperating it from the previous filter.
As you are running through the filters, you can hover over it to see what it looks like, this one is:
Country='USA' AND ContactTitle like '*Manager*'
that view will let you see obvious mistakes.
FIND is another useful tool in the BindingSource. Say you want to give someone the ability to type in a CustomerID and you want that record automatically selected at the click of a button.
MsgBox(Me.CustomersBindingSource.Find("CustomerID", "Greal"))
This will tell you what index customer Greal is at in the BindingSource, you can use that together with POSITION to select that row:
Me.CustomersBindingSource.Position = _
Me.CustomersBindingSource.Find("CustomerID", "Greal")
You can make this one line but it doesn't work well here so i split it with the _.
Why did I not just filter Customer Greal? Because you can use the index to do other things such as RemoveAt or after selected RemoveCurrent.
SORT
One of the most confusing things i've seen in a while is the .Sort of a binding source, i just couldn't figure out how to make it work! The trick is to do it just like you would a filter, to sort by City:
Me.CustomersBindingSource.Sort = "City"
That's not too confusing once you know, where it gets weird is selecting Ascending or Descending. I would have thought to add a ("City",1) or ("City").Descending or something, but you do it like this:
Me.CustomersBindingSource.Sort = "City DESC"
Right in there with the name of the column! I've never seen anything like it anywhere else in .NET.
This final item is one of the most useful, i will use it more than almost any other single piece of knowledge. Before, if i wanted to know what the value in a certain column of the current row I would get it from the datagridview. This often sucked, especially getting the entire row that i could then do things with. The answer is in BindingSource.Current. I don't know about you, but i rely a lot on intellisense to show me what a control/function/method etc can do, this time it really let me down. This is what it shows for Current:
 Gets the current item in the list. That is all it says, nothing more to see here. Except maybe the most useful thing in the BindingSource component. If you add the Column name here, you get what is in that column on the current row returned to you. Simple, if you know it.
MsgBox(Me.CustomersBindingSource.Current("CustomerID"))
No more scraping data off of controls, go directly to the source.
TableAdapters Part 2
Now for some more advanced training. In Part 2 we will build a link between 2 tables, one populating based on what was selecting in the first. If you want to follow along you will need the form built from Part 1.
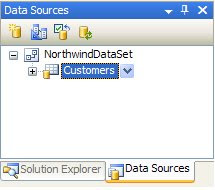
In your Data Sources screen, choose to select a new source. You can use the same connection string and this time add the "Orders" table. Notice that .NET created a new dataset that contains the Orders table.
In your Data Sources screen, choose to select a new source. You can use the same connection string and this time add the "Orders" table. Notice that .NET created a new dataset that contains the Orders table.

This took some work to learn, but is really cool, if anyone knows of a cleaner way, let me know, it seems there should be a more straightforward route. Right-click "NorthwindDataSet" and select "Edit DataSet with Designer". Do the same thing with the new dataset. Now you should have 2 .xsd files open, one with each table in it. Click on the Orders table and drag it to the tab of the other dataset, it should open that tab, and continue dragging until you get the icon for a safe drop and drop it. A relationship was created automatically and your screen should look something like this:
 If the relationship was not made, or if you want another, feel free to do so, it is pretty self-explanatory and very familiar to Access users.
You should now see that the Orders table has been added to the original dataset, but what is even better is that if you expand Customers, you will see another Orders table:
 What the heck is that? That my friends is a heck of a lot of work that you don't have to do! By adding the table to the dataset and including a relationship, .NET builds an Orders table that is a subset if you will of the current table. Long story short, by selecting a Customer from the top, you will see their related Orders on the bottom. If you were to use the Orders table beneath the customer table, and not the Orders table "inside" (hit the + on the Customer table and scroll down) then you would just see to tables, there would be no connection.
That is cool enough by itself, but expanding on it is even better. Instead of another datagrid, you could use a chart or a dial or a progress bar that could be bound to this second table so a change in one would change the controls bound to the other.
Next Stop: DataBinding
TableAdapters Part 1
The first step in letting .NET handle all of your data connections, datasets etc. is to add your data source to the project. Go to Data->Show Data Sources to get to the Data Sources screen and click "Add new datasource". It is pretty self explanatory from here to choose a database type, navigate to it, and choose the tables/views you want. If you want to follow along I am using Northwinds.mdb and for now have pulled only the customers table, there is a reason i did just one which you will see later.
 Before we go further, add a Split Container control to your screen and change its orientation to horizontal, set dock to fill.
NorthwindDataSet is the name of the dataset that was created for you, and Customers is the table within the DataSet. While the setting can be changed, it is important to know that .NET has built and is maintaining all of the connections, adapters etc. so you don't have to.
Drag the Customers table to the top half of your Split Container. This puts all of the data into a fully customizable datagridview control, more on those later. Set the dock to fill. The important thing is that you'll notice at the bottom of the screen .NET has also created:
- NorthwindDataSet
- CustomersBindingSource
- CustomersTableAdapter
- TableAdapterManager
- CustomersBindingNavigator
Personally I hate the toolbar that automatically appears at the top of the screen and delete it immediately but for now we will let it live.
Click Run to make sure everything looks good. I run my project often, that way if something isn't working I know what the most likely culprit is. If everything looks good and the datagridview is full of data then continue on, if not start over.
Right-click your form and select view code. You will see that some code has been automatically generated for you. Under the Load you will see something like:
Me.CustomersTableAdapter.Fill(Me.NorthwindDataSet.Customers)
This is what fills the dataset, it is set to do it on load, but you can move it anywhere you want so you can, say, load it on the click of a button. More on TableAdapters soon, but first notice that the system also generated some save code for you. This is tied to the toolbar back on your form, but you can use this code wherever you need it.
TableAdapter
This thing was very confusing to me at first but I think I can explain it rather easily now. Datasets contain tables, and these tables are filled with records that can be updated, inserted or deleted. The TableAdapter allows you to do this. Why use the TableAdapter instead of just manipulating the table directly? Because the TableAdapter is designed to handle everything for you, it manages primary and foreign key relationships, cascading updates and deletes, and perhaps the best of all it handles all of the locking and unlocking of records letting multiple users update the database simultaneously without fear of screwing up stuff, and without you programming it all in.
Lets look under the hood. Go to your form and right-click on your TableAdapter and select "Edit Queries in DataSet designer...", this opens another tab with a visual representation of your tables. This is an important place to get familiar with, if you manage your table relationships here then you can cobble together queries and tables that suit your needs and which .NET knows how to update. With this, you can choose update and .NET knows where all of the data goes, if you don't do it this way then you have to pull apart queries into their underlying tables and then update the data manually. That is a no-no.
Right-click on the fill portion of the TableAdapter and select "Configure...":
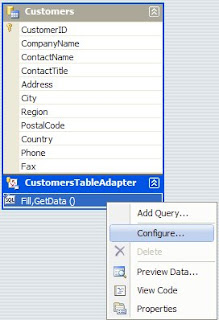 Here you will see the Select statement that is being used to pull the data, we will look more in-depth at this later, just know that this is where you can customize what gets pulled and loaded into the dataset. The "Query Builder" button lets you build the query just like you would in access, very handy. Right-Clicking the fill portion again and choosing "Add Query..." will let you build your Insert, Delete and Update statements.
DataSets and TableAdapters
Before .NET 2005 I accessed data the same way every one had for years, build a connection string to a database, build a command, open the connection, run the command and close the connection. That was the process if you were lucky and didn't have to do inserts or cascading deletes or updates. Some poor folks still do it this way, typically saying crazy things like "it gives me more control over what i'm doing". Complete nonsense. I know this because i've said it myself many times.
What is the solution then? Let .NET handle it the way it handles the building of your buttons, labels and textboxes. For over 2 years I tried to use it and it seemed too complicated, I still cannot point to one site that shows how to do this. Some sites may show how to setup the connection and some basic functionality but that's it, i need more than to just populate a datagrid. I created a project and swore off all handling of the data, I wanted to see if .NET could handle it all. At several points I almost gave in, almost added just a few lines of my own code because I couldn't find a suitable solution anywhere, but I stuck to it and finally got it right. Now that I got it and understand it, I will NEVER handle my own connections etc. again.
In the next couple of posts I will document what I have learned.
Reboot
I have deleted the entries here and I am making a new effort at keeping this thing up to date. When I run into a problem programming, I can usually find the answer using Google. If the answer is not straightforward, lacking in some way, or non-existant then I will post my workable solution here. I will post as many error messages as possible so solutions might be easier to find.
This blog is basically for my own use, to save me from having to "re-discover" solutions to tough problems, but if others find the knowledge useful I am happy to help.
This blog is basically for my own use, to save me from having to "re-discover" solutions to tough problems, but if others find the knowledge useful I am happy to help.
Subscribe to:
Posts (Atom)