While you can create a sample on your own, it is best to start the Tablet Programming series at part 1 to build a sample. If you don't need a sample, jump right in.
This first part will only work on systems that can tell how the pen is being held, i'm not sure whether or not they all are, but just know you MAY not be able to do this on your particular model.
Erasing:
I thought this part would be a lot harder than it is (it can be if you try to get too fancy!).
From the left dropdown select inkOverlay, and select CursorInRange on the right to create a new event.
In the event place this code:
If e.Cursor.Inverted = True Then
If inkOverlay.EditingMode <> InkOverlayEditingMode.Delete Then
inkOverlay.EditingMode = InkOverlayEditingMode.Delete
End If
Else : Me.inkOverlay.EditingMode = Me.inkOverlay.EditingMode
End If
This is pretty self explanatory, if the cursor is inverted (like you are using an eraser) then the mode changes from drawing to deleting. You can play with the different delete modes, but the one above is the best in my opinion. You can just as easily call the ClearInk() function after e.Cursor.Inverted=True to clear the whole thing.
This is pretty self explanatory, if the cursor is inverted (like you are using an eraser) then the mode changes from drawing to deleting. You can play with the different delete modes, but the one above is the best in my opinion. You can just as easily call the ClearInk() function after e.Cursor.Inverted=True to clear the whole thing.
Selection:
One really cool feature is to allow people to move their text or drawings around, you do this with the select feature. Add a checkbox to your form and in its event place the following code:
If Me.CheckBox1.Checked Then
Me.inkOverlay.Enabled = False
Me.inkOverlay.EditingMode = InkOverlayEditingMode.Select
Me.inkOverlay.Handle = Me.Panel1.Handle
Me.inkOverlay.Enabled = True
Else
Me.inkOverlay.Enabled = False
Me.inkOverlay.EditingMode = InkOverlayEditingMode.Ink
Me.inkOverlay.Handle = Me.Panel1.Handle
Me.inkOverlay.Enabled = True
End If
All very straightforward, disable, change mode selection, reset the handle, and re-enable. Now checking the box will allow us to select items. To do this in conjunction with the cursor in range code from above we have to make a minor change, the entire cursor in range code should look like this:
If e.Cursor.Inverted = True Then
If inkOverlay.EditingMode <> InkOverlayEditingMode.Delete Then
inkOverlay.EditingMode = InkOverlayEditingMode.Delete
End If
ElseIf Me.inkOverlay.EditingMode = InkOverlayEditingMode.Select Then
Me.inkOverlay.EditingMode = InkOverlayEditingMode.Select
Else : Me.inkOverlay.EditingMode = Me.inkOverlay.EditingMode = InkOverlayEditingMode.Ink
End If
We are adding some handling for the select mode, had we not done this then even when the checkbox was checked if the pen went out of and then back into range, it would have changed to ink.
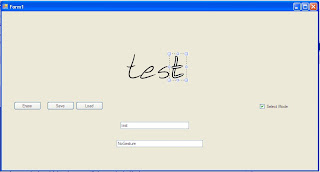
Now check the box and you should see your cursor change to a different symbol (kind of like cross-hairs) and you can draw lines around data to select it. It's hard to explain but just try it or look below.

Once it is selected, the movements and resizing should be familiar to you. Here is a shot of the strokes fully selected. If you notice an extra textbox its because i backed up to do the select piece after i did the gesture part below.
Gestures:
Gestures allow you to do things, or fire events when certain movments are made with the pen. For this tutorial I will demonstrate a few of the default gestures. There will be a more robust gesture control post later, for now, i'll demonstrate the basics.
First, there are 3 types of ink collection: GestureOnly, InkOnly, and InkAndGesture. You will need to change this as needed , usually in the form load event:
inkOverlay.CollectionMode = CollectionMode.InkAndGesture
inkOverlay.SetGestureStatus(ApplicationGesture.AllGestures, True)
AddHandler inkOverlay.Gesture, AddressOf Gesture_Event
inkOverlay.Enabled = True
This bit of code changes the mode as metioned above to InkAndGesture. Now, if you were to have all gestures available all of the time, you wouldn't get a whole lot of ink input because much of it would be interpreted as gestures. So, you can set which gestures you want to 'watch' for individually with SetGestureStatus. I selected AllGestures for this demonstration but you can play with it and see what it can do. Further down i will post a link to Microsoft's page describing each of the gestures.
The next part of the code creates a handler, this is a subject for another post, but just know that it lets us create a Gesture_Event and do something when the gesture occurs. Here is the Gesture_Event code:
Private Sub Gesture_Event(ByVal sender As Object, ByVal e As InkCollectorGestureEventArgs)
Dim theGesture As Gesture = e.Gestures(0)
TextBox2.Text = theGesture.Id.ToString
End Sub
In it, we are just getting the name of the gesture that was made and placing it into a textbox so you can look at what gestures are being recognized. Run the program and try to find some of the gestures listed here. http://msdn.microsoft.com/en-us/library/aa515956.aspx
Next: Advanced Gesture Control
No comments:
Post a Comment